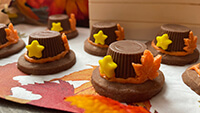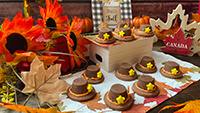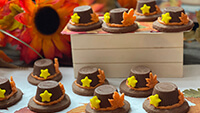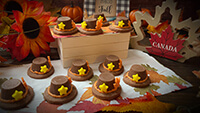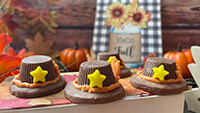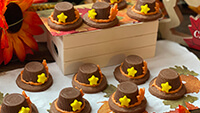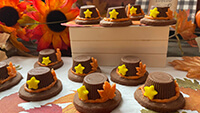


Pilgrim Hat Chocolate Cookies
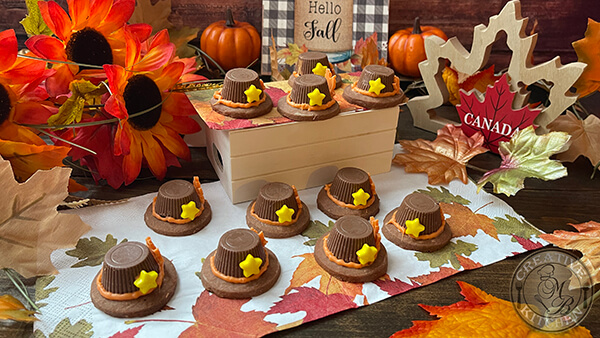
Hello, Autumn! Indulge in History, Taste the Chocolate Mystery! Get ready to add a touch of enchantment and delectability to your Thanksgiving gathering with our delightful Pilgrim Hat Chocolate Cookies! These autumnal delights are perfect for your fall gatherings. These charming treats consist of rich chocolate cookies adorned with sweet, colorful decorations. Whether you're looking for a fun baking project to enjoy with family or friends, these adorable cookies will undoubtedly create a memorable experience for your Thanksgiving guests.
Cookies Ingredients:
- 1 ⅛ Cups All Purpose Flour
- ½ Cup Unsalted Butter, room temperature
- 1 Tablespoon Hershey’s Unsweetened Cocoa Powder (or your choice of unsweetened cocoa powder)
- ½ Cup Icing Sugar (powdered sugar)
- ¼ Teaspoon Salt
- 1 Teaspoon Vanilla Extract
Cookies Instructions:
- In a stand mixer bowl, add butter, vanilla, and sift in powdered sugar.
- Mix on medium-high speed for about 1-2 minutes until light and combined.
- Stop the mixer. Sift cocoa powder and add flour and salt (if using unsalted butter)into the mixer bowl.
- Continue to mix until both are just combined.
- Remove the dough from the mixer bowl and roll it into a ball.
- Wrap the dough with cling wrap.
- Refrigerate the dough for 2 hours.
- Preheat the oven to 340 degrees F.
- Prepare your baking pan and line it with parchment paper or a Silpat.
- Take out the dough and roll it to your desired thickness on a lightly flour surface, your rolling pin and some on the dough if necessary when rolling.
- Cut it with a round cookie cutter. We used the size of the round cookie cutter as shown in the video demo. However, you can use any size you think is suitable and available to you.
- Place the cut cookies on a prepared baking pan and bake them for 4-5 minutes . These cookies won't take long to bake because they're thin. Keep an eye on them at 4 minutes. If the cookies are set before 5 minutes, take them out.
- Let them cool on a baking pan for at least 5 minutes before removing them to a wire rack to cool completely.
- Once the cookies are completely cool, prepare to assemble them.
Pilgrim Hat Ingredients:
- REESE'S Miniatures PEANUT BUTTER CUPS Candy
- Yellow Star Sprinkle (or your choice of sprinkle)
- 1/4 Cup Melted Orange Candy Melt (-/+ adjustable)
- Fall Leaves Chocolate/Candy/Sprinkle Decorative (Optional)
- Piping Bag
Pilgrim Hat Instructions:
- Unwrap REESE'S Miniatures PEANUT BUTTER CUPS Candy into a bowl. Set them aside.
- Prepare to melt your candy melts.
- You can place a fall-themed decoration on the side of the hat before the hat band chocolates set if you like; this is optional. You can use anything, such as fall leaf-shaped chocolates (homemade or store-bought), fall-themed decorative sprinkles, candy, etc.
- Transfer some of the melted candy melt into a ziplock bag or a piping bag and snip a small hole at the end of the bag. You don't need a piping tip if you don't want to.
- Use the candy melt as an adhesive to assemble the cookies at the same time.
- Take one REESE'S Miniatures PEANUT BUTTER CUPS Candy and dab some melted chocolate on the top of the cookies as shown in the video demo.
- Gently press down to glue them together in the center as shown.
- Pipe some candy melt as the hat band around the chocolate as shown in the demo.
- Dab some candy melt at the bottom of the yellow star sprinkle as the buckle and gently press it onto the Reese's chocolate as shown in the video demo.
- Place a fall-themed decoration on the side of the hat (Optional)
- Repeat the process with the remaining cookies.
- Set the pilgrim cookies on the cooling rack until everything is set before storing them in an airtight container.
- These can be stored at room temperature for up to 7 days.
- You can store them in the fridge for up to two weeks in an airtight container.
- If you intend to keep them in the freezer, refrain from assembling the cookies until you're prepared to bake them.
- However, the baked cookies themselves can be stored in the freezer for up to two months. Wrap the cookies in cling wrap, then wrap them in foil and keep them in a freezer-safe ziplock bag. Make sure to label it. When you are ready to assemble them, take them out of the freezer and thaw them in the fridge overnight a day before you plan to assemble or decorate them.
*** © MB CREATIVE KITCHEN, 2022. No part of this site,, MBCREATIVEKITCHEN.COM may be reproduced in whole or in part in any manner without the permission of the copyright owner.
Tips & Notes:
- You can substitute melted chocolate with homemade or store-bought orange cookie icing.
- We used Yellow Star Sprinkles, but you are welcome to use your choice of sprinkles for the buckle. We bought these from our local baking supply store.
- You can place a fall-themed decoration on the side of the hat if you like; this is optional. You can use anything, such as fall leaf-shaped molded chocolates (homemade or store-bought), fall-themed decorative sprinkles, candy, etc.
- The above setting, time, and temperature are based on our oven. All ovens work differently. Please adjust your oven temperature and settings accordingly.
- The cookies are thin (we rolled them in 2mm), so they won't take long to bake. Keep an eye on them at 4 minutes. If the cookies are set before 5 minutes, turn off the oven and take them out.
- You can use your choice of unsweetened cocoa powder.
- In this recipe, we incorporated 1 tablespoon of cocoa powder; however, if you desire a subtler cocoa taste, opt for ¾ of a tablespoon.
- Double up the recipe ingredients if you plan to bake a big batch.
- These cookies can be stored at room temperature for up to 7 days.
- You can store them in the fridge for up to two weeks in an airtight container.
- If you intend to keep them in the freezer, refrain from assembling the cookies until you're prepared to bake them.
- However, the baked cookies themselves can be stored in the freezer for up to two months. Wrap the cookies in cling wrap, then wrap them in foil and keep them in a freezer-safe ziplock bag. Make sure to label it. When you are ready to assemble them, take them out of the freezer and thaw them in the fridge overnight a day before you plan to assemble or decorate them.