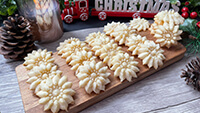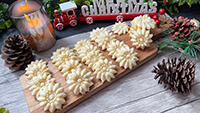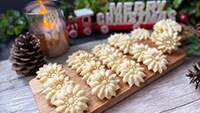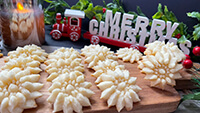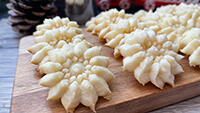


Eggnog Sugar Cookies
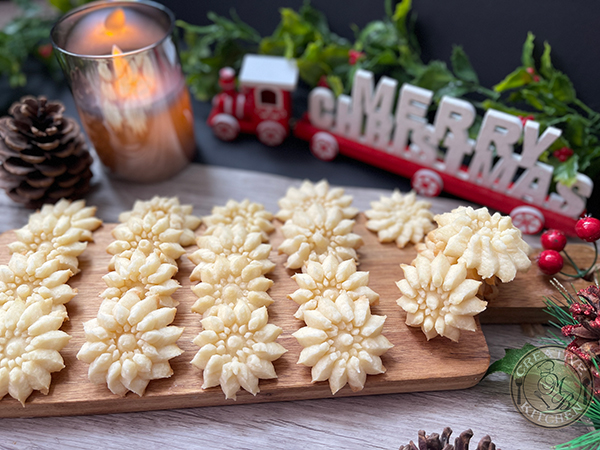
Eggnog season is here! Have you thought of adding some eggnog to your sugar cookies? Well, we did. These eggnog sugar cookies are extremely easy to prepare or put together, whether you use a fancy Christmas-themed cookie cutter or a cookie press. The eggnog flavor in this sugar cookie is very light and it won’t give you an overly eggy aftertaste.
Ingredients:
- 1 Cup + ¼ Cup All Purpose Flour
- ¼ Cup + ⅛ Cup Unsalted Butter
- ¼ Cup Eggnog
- ½ Cup Granulated White Sugar
- ⅛-¼ Teaspoon Salt
- ¼ Teaspoon Vanilla Extract
- ⅛ Teaspoon Almond Extract
We Used:
Instructions:
- Preheat the oven to 350 degrees F.
- In a stand mixer or handheld mixer, slightly cream the butter.
- Add the granulated white sugar, salt, vanilla extract, and almond extract into the butter and continue to mix at a low speed until just combined.
- Add ⅓ of the flour in the butter mixture and mix on low speed.
- While the mixer is still running, slowly pour in half of the eggnog and continue to mix for a second.
- Then add the remaining flour and eggnog to the mixture. Mix on low until everything is just combined. Remember to scrape down the sides of the bowl throughout the process.
- Transfer the dough to your work station and with your hand, knead to combine them into a big dough as shown.
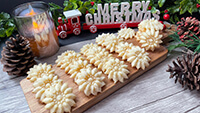
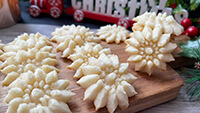
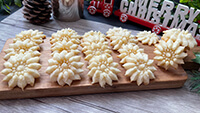
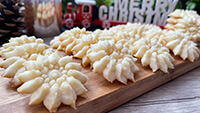
- Roll to your desired thickness and cut out the dough with your choice of cookie cutter or cookie press. We decided to use a cookie press, but you can cut them into any shape you want.
- Since we are using a cookie press for our batch, roll the dough into several big balls as shown.
- Prepare the baking sheet, select your favorite cookie press disc, and follow all the instructions on your cookie press on how to use it.
- Fill one cookie dough ball inside the cookie press canister and screw it back. You can always refill the cookie dough as you go.
- Put the cookie press directly on the baking sheet and press. Slightly twist, lift up, and continue the same process. Refill the cookie dough as you go.
- Bake at 330 degrees F for 6–8 minutes, or until the top looks set. Don’t overbake. As soon as the top has set, remove them from the oven. All ovens work differently. Please adjust your oven temperature and settings accordingly. The above setting, time, and temperature are based on our oven as well as the size and thickness of our cookies.
- Transfer the baked cookies to a cooling rack to cool completely before storing them in an airtight container. You can leave the cookies at room temperature for up to 3 days, in the fridge for 5 days, or in the freezer for 4 weeks if stored properly.
*** © MB CREATIVE KITCHEN, 2022. No part of this site,, MBCREATIVEKITCHEN.COM may be reproduced in whole or in part in any manner without the permission of the copyright owner.
Tips & Notes:
- Preheat the oven to 350 degrees F and bake at 330 F. This method involves preheating the oven to a higher temperature for initial heat and then lowering it for even baking. Using this approach typically results in better spread and a more even texture. The higher initial temperature helps set the edges quickly, while the lower temperature allows for thorough baking without over-browning, resulting in a nicely baked exterior (as seen in the final results). Of course, you can use your own methods.
- We used a cookie press, but you don’t have to if you don’t want to use the press. You can use a cookie cutter of your choice and cut them out into any shape you want.
- If using a cookie press, select the disc that comes with the press.
- Using a cookie press may seem challenging to some, but practise makes perfect. If you can’t use a cookie press, that is totally fine; just roll them out and cut them out with your choice of cookie cutter.
- Double the ingredients for a big batch.
- You can use salted or unsalted butter. If you use salted butter, omit the salt.
- You can leave the baked cookies at room temperature for up to 3 days, in the fridge for 5 days, or in the freezer for 4 weeks if stored properly.
- These baked eggnog sugar cookies freeze well. They are similar to regular sugar cookies, with a delicious eggnog flavor. Make sure to let the cookies cool completely after baking to prevent condensation, which can affect their texture.
Place the cooled cookies in a single layer on a baking sheet and freeze for about 1 hour until solid. Once frozen, transfer them to an airtight container, using wax paper or parchment paper between layers to prevent sticking. Be sure to label the container with the date. When you're ready to enjoy them, thaw the cookies at room temperature. - You can make the dough ahead of time and store it properly in the freezer until you are ready to use it. But make sure to thaw them in the fridge the day before you plan to bake them. If you're using a cookie press, leave them out on the counter until they're pliable. Cold dough is hard to work with if using a cookie press, unlike cut-out methods.
- All ovens work differently. Please adjust your oven temperature and settings accordingly. The above setting, time, and temperature are based on our oven.
- Since we used a cookie press, the cookie is thin, and it doesn’t take long to bake. Please keep an eye on it.
- The bake time is based on the thickness of the cookie, so the temperature may vary. Please adjust accordingly and do not overbake the cookies in the oven.