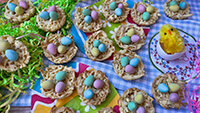


Adorable Easter Egg Nest Cookies

Your Easter baking activities will definitely be stepped up with these adorable, fun, colorful and tasty Easter Egg Nest Cookies. If you love these super addictive and delectable mini eggs chocolate, you will surely enjoy baking these buttery and custardy rich edible egg nest cookies topped with Easter mini eggs chocolate.
Ingredients:
- 1 Cup All Purpose Flour
- ½ Cup Custard Powder
- ½ Cup Corn Starch
- ½ Cup Salted Butter (If using unsalted, add a pinch of salt)
- ½ Cup Granulated White Sugar
- 2 Tablespoons Condensed Milk
- ¼ Teaspoon Baking Powder
- 1 Teaspoon Vanilla Essence
- 1 Egg Yolk (Large egg)
- ⅛ Teaspoon Salt (If using unsalted butter only)
- ½ Teaspoon Unsweetened Cocoa Powder
- 1-2 Tablespoons Milk (-/+ adjustable if needed more)
- Easter Mini Eggs Chocolate
- Baking Paper Cup
Edible Adhesive (Optional):
- 1-2 Teaspoons Icing sugar
- ⅛ Teaspoon Water (-/+ adjustable)
Instructions:
- Sift flour, baking powder, custard powder and cornstarch into a bowl. Set aside.
- Add butter and sugar to a mixing bowl.
- Slightly cream butter and sugar with a hand mixer or stand mixer at medium-low to medium speed. Scrape down the sides once in a while. Add the egg yolk and continue to mix for a minute.
- Remove the creamed butter and sugar from the stand mixer.
- Add in condensed milk,vanilla essence and mix with a spatula until just combined.
- Add the flour mixer. Stir to mix wet and dry ingredients until combined. Add in milk.
- Switch kneading and mixing processes with your hand. Knead until the crumbly dough becomes a pliable dough. As you knead, the dry ingredients will absorb the wet ingredients. Do not try to add more milk at this stage. Knead first and use your judgment at the end if you need to add a little bit more milk.
- To make tinted dough, take out roughly half a cup or a quarter of the dough above and put the half cup of dough or quarter of the dough in a separate bowl. It doesn't need to be equal or the same size. We simply took out a quarter of the dough. Making the plain dough more than the tinted dough.
- Set the plain dough aside first.
- Now back to the other half of the dough.
- Add cocoa powder to this half of the dough and mix or knead until everything is combined. The dough should be tinted by now. Don't worry about the uneven color as we want a natural look and not a perfectly tinted dough.
- Divide plain dough into thirds and tinted dough into thirds as well, as shown in the video.
- Roll each of them into a log. No need to be in perfect shape.
- Randomly mix the chocolate dough and the plain dough together into a big, thick log. It doesn't matter how you mix them. When we grate them up, we want a random natural look with two different colors.
- Wrap the rolled dough with cling wrap and chill it for 2 hours in the fridge or overnight. We chilled our dough overnight. It's easy to grate when the dough is fully chilled.
- Preheat the oven to 340 F.
- Prepare the baking cups.
- Take out the dough from the fridge and remove the wrap.
- Cut half of the dough and cover the rest to avoid drying out.
- With a grater, carefully grate the dough onto a plate. Watch out for your fingers. Go slowly and gently. Try not to break up too much of the grated dough.
- Work in batches.
- Once this part is done, with a spoon, gently spoon out the grated dough as shown in the video onto a baking paper cup.
- Place the grated dough around the baking cup as shown.
- Once this step is done, bake them in a preheated oven at 340 for 15 minutes or until the cookies are set. All ovens work differently. Adjust the temperature and time accordingly.
- When the cookies are ready, remove the baking sheet out of the oven. Leave them on the baking cup for about 10 minutes or so.
- Let the cookies cool down in a baking paper cup. Do not try to remove them while they are still warm.
- After roughly about 10 minutes or so, gently remove the cookies from the baking cup and place them on a wire rack.
Decorating the cookies:
- Add icing sugar and water in a small bowl.
- Mix until combined. If too runny, add some icing sugar.
- There are two ways to decorate the cookies. We will show you both.
- Option one - Dip the bottom of the mini eggs in an icing sugar mixture and place them in the center of the cookies as shown. Once the icing is set, the chocolate will stick to the cookies. Let the cookies cool completely before storing them in an airtight container.
- Option two - Insert a few mini eggs in the center of the cookies without the edible adhesive (icing sugar mixture).
*** © MB CREATIVE KITCHEN, 2022. No part of this site,, MBCREATIVEKITCHEN.COM may be reproduced in whole or in part in any manner without the permission of the copyright owner.
Tips & Notes:
- We used salted butter but if you prefer unsalted, just add a pinch of salt.
- If you can't take butter, substitute butter with lactose-free butter or margarine.
- The temperature and setting of the oven may vary. Please adjust accordingly. Add extra minutes if needed.
- We tinted the other half of the dough with cocoa powder instead of edible food coloring to give a mild cocoa taste in the dough.
- Chilling the dough before grating them is highly recommended, preferably overnight chilling in the fridge. We chilled our dough overnight.
- Prepared dough can be made ahead of time and stored in the fridge for up to 4 days or for longer storing in the freezer up to 3 weeks before you are ready to bake them.
- You may add extra milk if the dough at the end is dry, but as mentioned in the instructions #7, knead with your hand first because once the dry ingredients absorb the wet ingredients, it will become a pliable dough.
- Instead of milk, you can use lactose-free milk or low-fat milk.
- Double or triple up the recipe ingredients if you want to make a big batch.
- Although we just need the egg yolk, don't throw away the egg white. You can add them to pancakes, fried rice,etc. That's how we normally use our extra egg whites.