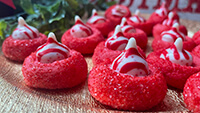


Holiday Hershey’s Red Velvet Blossoms

These sparkly red beauties, buttery rich and delicious cookies are perfect holiday cookies to include in your cookie tray this holiday season. These Holiday Hershey’s Red Velvet Blossoms are made with pure butter, tinted with edible red-colored gel, slightly flavored with beetroot powder and topped with Hershey’s Candy Cane Kiss chocolate. If you love shortbread and kiss chocolate, you have to try these delectable cookies!
Ingredients A:
- 2¼ Cups All Purpose Flour
- ¾ Cups Cornstarch
- ¾ Cup Powdered Sugar
- 1½ Cups Salted Butter (Room temperature)
- ⅛ Teaspoon Salt (If using unsalted butter)
- 1 Teaspoon Pure Vanilla Extract
- ½ Teaspoon Pure Almond Extract
- ¼-½ Teaspoon Organic Beet Root Powder (**Refer #1 under tips & notes)
- Edible Red Food Coloring Gel
Ingredients B:
- Hershey’s Chocolate (We used Christmas edition Hershey’s)
- Red Sanding Sugar
Instructions:
- Add all-purpose flour, cornstarch and beet root powder to a sifter and sift them together into a bowl; set aside.
- Add butter, pure vanilla extract, pure almond extract, and salt (if you are using unsalted butter) to the bowl of a stand mixer.
- Mix until just combined.
- To avoid visible clumps of powdered sugar or icing sugar, sift the powdered sugar into a stand mixer bowl or hand-held mixer bowl.
- Start on low-medium low speed and gradually increase the speed of the mixer, and mix until light and fluffy. Then gradually increase the speed to medium. Make sure to scrape the sides of the bowl once in a while to ensure everything is mixed evenly.
- Gradually add the flour mixture into the butter mixture and mix until just combined into a dough at low speed.
- If the dough is too dry, add some milk or water until the dough is pliable. If the dough is too wet, dust some flour on your palm or on the dough before shaping it. There are times when that can happen, so use your judgment.
- Add some red coloring gel to the dough and knead with your hand until the color is incorporated into the dough. Adjust to your desired shades by adding the coloring gel a little bit at a time. However, you can add the red coloring gel in when you mix the wet ingredients, but we decided to add them after. Feel free to use your own way.
- Wrap the dough with cling wrap and chill them in the fridge for two hours or overnight. We chilled them for two hours.
- When you are ready to bake, take the dough out and leave it on the counter for 15 minutes or so.
- Preheat the oven to 340 degrees F.
- Pour some sanding sugar out in a bowl or plate. Set aside for later.
- Scoop out some dough and roll it into a ball. It doesn’t need to be the exact same size as us. You can roll them into your desired size.
- Next, roll the dough ball into the sanding sugar.
- Then use your finger and gently press down and make a slight dent in the middle. Repeat the same process with the remaining.
- Transfer it to a prepared baking sheet.
- Bake in the preheated oven for 15–18 minutes at 325 degrees F or until the bottoms of the cookies are slightly browned. Please note that the above temperature, time and setting are based on our oven. All ovens work differently. So please adjust temperatures, settings, and time accordingly.
- While waiting for the cookies to bake in the oven, remove the wrapper of the Hershey’s kisses chocolate and place the chocolate in a bowl.
- When the time is up, take the cookies out of the oven. Let the cookies sit on the baking pan for 5 minutes.
- Then place one kisses chocolate on the cookie. Allow the remaining heat to melt the bottom of the chocolate, which will set on the cookie as it cools.
- Repeat with the remaining.
- When that is done, carefully transfer the cookies to a cooling rack and let them cool completely before storing in an air-tight container at room temperature for up to 4 days or in the fridge for up to a week.
*** © MB CREATIVE KITCHEN, 2022. No part of this site,, MBCREATIVEKITCHEN.COM may be reproduced in whole or in part in any manner without the permission of the copyright owner.
Tips & Notes:
- If you don’t want to use beetroot powder, you can just use an edible red food coloring gel alone. We used organic beet root powder for a slight hint of flavor from the beetroot and then tinted it with red coloring gel to brighten the color. Adjust the amount of red food coloring gel depending on how red you want your finished cookies to be.
- We decided to add the red coloring gel after and knead with our hands to incorporate the color into the dough. However, you can certainly add the red coloring gel when you prepare the wet ingredients. Feel free to use your own method. They both work just fine.
- We used Hershey’s special holiday edition kisses but you can use any kind of Hershey’s kisses chocolate.
- We tried adding the chocolate right when they came out of the oven, and some of the chocolate melted and flattened. In the second experiment, we let the cookies sit on the baking sheet for roughly 5 minutes before adding the chocolate. Then we topped them with chocolate kisses. The end result is way better. What works for you might not work for me, and what works for me might not work for you. So feel free to use your own methods, though.
- Double or triple up the recipe if you plan to make a big batch.
- Baked cookies can be stored in an air-tight container at room temperature for up to 4 days, in the fridge for up to a week and if stored properly in the freezer for up to a month.
- You can make the dough ahead of time and store it in the fridge for up to 3 days. Simply take them out, prepare and bake them when you are ready.
- You can freeze the dough in the freezer. Simply thaw the dough in the fridge overnight on the day before your baking day.
- We chilled our dough for two hours to enhance the flavor of the cookies before rolling and baking them up.
- We don’t have a problem with flattening cookies after baking for both batches. But if that is the case for you, chilling the dough for a few hours before rolling may help.
- Please note that the above temperature, time, and setting are based on our oven. All ovens work differently. So please adjust temperatures, settings, and bake time accordingly.